
Are you ready to elevate your arm game? Hammer curls are an essential addition to your exercise arsenal. In this article, we’ll dive deep into the world of hammer curls, exploring their benefits, proper form, variations to change things up and even some tips and tricks to help you build impressive arms. This is the Ultimate Guide to Hammer Curls!
Whether you’re a beginner or an experienced athlete looking for new arm exercises to add to your routine, this guide will have something for everyone. Are you ready to dig in? Let’s get started!
What Are Hammer Curls?
Hammer curls are an effective exercise, mainly targeting the biceps and forearms, that can really change the look of your arms. As their name suggests, hammer curls involve performing a curl (a traditional arm-curl exercise) while your palms are facing inwards. This grip places emphasis on the short (inner) biceps head —the biceps brachii. Targeting and building the inner biceps can add significant size the the bicep and make for larger arms overall.
In addition to targeting your inner biceps, hammer curls also work the shoulders and forearms muscles—including the anterior deltoids (front shoulder muscles) and forearm flexors. By incorporating hammer curls into your workout routine, you can effectively build size and strength in both your arms and forearms at the same time.
Benefits of Hammer Curls for Biceps and Forearms
Hammer curls are a great way to target your biceps and forearms for improved arm strength and size. The key benefits of this exercise is that it increases the size of your biceps while also putting emphasis on the brachioradialis – this is the muscle on top of your forearm when the arm is in the “hammer” position.
For starters, the hammer curl helps increase your bicep size and strength as it primarily works the belly of the bicep. This can help you in a wide variety of exercises, from building up your arms for more impressive muscular gains, to improving support for heavy bodyweight lifts like pull-ups.
Aside from increasing muscle size, this exercise also helps improve wrist stability by developing stronger forearms. Your wrists take a lot of strain when lifting weights and hammer curls help prepare them for heavier weights, which can help prevent injury while lifting or doing other activities requiring wrist movement.
Finally, hammer curls are great for strengthening your grip. Because this exercise engages both muscles in your arms and forearms, as well as little muscles in your hands, it can be very beneficial to improving your grip strength—essential when attempting deadlifts or chin-ups!
Muscles Worked During a Hammer Curl
When you do a hammer curl, you’re working two main muscle groups: the biceps brachii and the brachialis. The biceps brachii is responsible for both shoulder flexion and elbow flexion, so when you hammer curl, it is getting worked because you are lifting your arm up as well as curling your arm up.
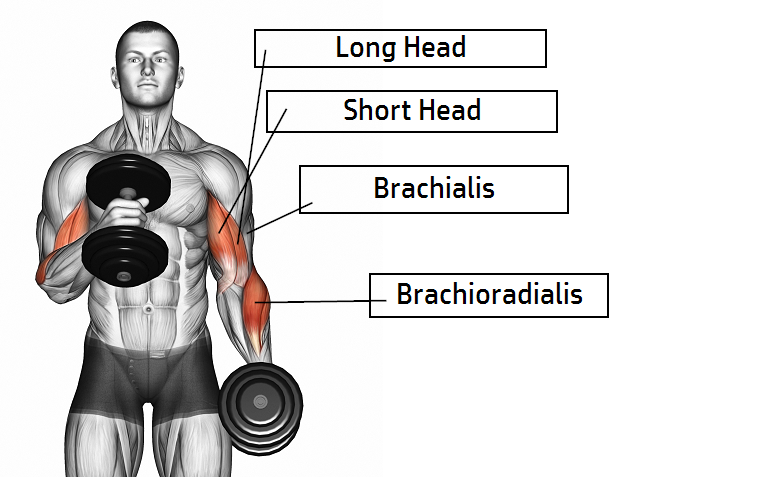
The brachialis is a muscle that lies underneath the biceps and helps with elbow flexion. Hammer curls target this muscle specifically, making them an effective exercise for building strong arms. Hammer curls also target the long head of the bicep, helping to develop peak-shaped upper arms. Plus, hammer curls work the brachioradialis which is responsible for forearm supination – or rotating your forearm when it’s bent.
So overall, hammer curls provide an effective way to work multiple muscles in your arms at one time—including shoulders, forearms and upper arms—to build stronger and more defined muscles!
Proper Form & Execution of Hammer Curls
When it comes to hammer curls, proper form and execution is key for avoiding injury and maximizing the benefits of this exercise. In order to properly execute a hammer curl, make sure you do the following:
Palms should face inwards
One of the biggest mistakes people make with hammer curls is rotating their palms so they’re facing upwards as they curl the weights. Doing this reduces the tension on the inner biceps. It will likely force you to use smaller weights and isn’t the proper way to do the exercise.
Instead, keep your palms facing inwards as you move through the entire range of motion. This will help engage your inner biceps and forearms more effectively and make the most out of each curl.
Core should be properly engaged
Engaging your core during exercise, including the hammer curl, is crucial for a number of reasons. A strong, stable core not only improves your overall balance and posture, but it also helps to protect your spine and prevent injuries. When you engage your core muscles, you’re providing a solid foundation for your body to perform various movements more efficiently and effectively.
This leads to better performance in your workouts and everyday activities, as well as a reduced risk of back pain and other musculoskeletal issues. So, remember to keep that core tight and engaged to reap the full benefits of your exercise routine!
Consider alternating hammer curls if form is difficult to maintain
Alternating arms while performing hammer curls will make is easier to maintain proper form. It will also add many other potential benefits. Here are a few reasons why you might want to alternate:
- Improved focus on form: Alternating arms allows you to concentrate on the movement and technique of each arm individually. This can help ensure proper form and muscle activation, reducing the risk of strain or injury.
- Enhanced muscle activation: By isolating each arm, you can better engage the target muscles (biceps and forearms) and prevent muscle imbalances that could arise from favoring one arm over the other.
- Increased core engagement: When you work on one arm at a time, your core muscles need to work harder to stabilize your body and maintain balance. This adds an element of core strengthening to your hammer curls.
- Better fatigue management: Alternating arms can help manage fatigue by allowing one arm to rest while the other is working. This can help you maintain better form throughout the exercise and potentially perform more repetitions.
- Greater variety and challenge: Incorporating alternating arm movements can add variety to your workout and present a new challenge for your muscles, helping to prevent plateaus and promote consistent progress.
While both alternating and simultaneous arm hammer curls have their benefits, incorporating both variations into your workout routine can provide a well-rounded approach to bicep and forearm training.

Tips & Tricks for Effective Performance
Hammer curls are great for building your forearms and biceps — but, as with any exercise, it’s important to have good form. Here are some tips and tricks to make sure you’re getting the most out of each rep:
- Start with the right weight. If you’re just starting out with hammer curls, it might be a good idea to start light and slowly increase your weight as you build strength in your forearms and biceps. You should feel a slight burn after each set — not so much that it’s painful, but just enough that you know you’ve been working your muscles.
- Keep your elbows tucked in. Try to keep your elbows tight against your body during each rep; don’t let them flare out or else you won’t engage as many muscles in the exercise and won’t get the full benefit of the workout.
- Improve your grip. The stronger your grip, the more weight and reps you can lift. That’s why it pays to focus on strengthening your grip with things like towel pull-ups or forearm squeezes. You can even go for a massage or chiropractic adjustments to improve wrist mobility before performing hammer curls.
- Increase Intensity. Adding variations and intensity techniques can help push your performance even further. For example, you can slow down the reps or take a brief pause at the top of each rep to increase muscle time under tension, leading to greater gains in biceps strength and mass.
- Try different variations of the exercise like alternating hammer curls or half-hammer curls (when you only curl halfway between starting position and shoulder level).
With these tips in mind, you should be able to get great results from hammer curls every time you hit the gym!
Variations of the Hammer Curl Exercise
When you’re tackling hammer curls, you’re working your biceps and forearms in different ways—and that’s where the variations come in handy. Each variation of the hammer curl exercises a slightly different set of muscles and can help increase strength even further.
Pinwheel Curl
A pinwheel curl, also known as a cross-body hammer curl, is a variation of the traditional hammer curl that targets the biceps and forearms. In this exercise, you curl the dumbbell across your body toward the opposite shoulder, rather than lifting it straight up in front of you as in a regular hammer curl.
Here’s how to perform a pinwheel curl:
- Stand with your feet shoulder-width apart, holding a dumbbell in each hand with a neutral grip (palms facing your thighs).
- Keep your elbows close to your body and maintain a slight bend in your knees.
- Slowly curl the dumbbell in your right hand across your body, lifting it toward your left shoulder. Keep your wrist in a neutral position and do not rotate your forearm during the movement.
- Pause briefly at the top of the movement, squeezing your bicep.
- Slowly lower the dumbbell back to the starting position and repeat the movement with your left hand, curling the dumbbell toward your right shoulder.
- Continue alternating between arms for the desired number of repetitions.
Incorporating pinwheel curls into your workout routine can add variety and challenge different parts of your biceps and forearms, leading to well-rounded muscle development.
Here’s a short video where John Meadows explains and shows us a quick demonstration:
Hammer Incline Curl
A hammer incline curl is a variation of the traditional hammer curl that targets the biceps and forearms while adding an additional challenge to the exercise by using an incline bench. Performing hammer incline curls can lead to increased muscle activation in the biceps and brachialis due to the angle of the bench.
Here’s how to perform a hammer incline curl:
- Set an incline bench to an angle of about 45 degrees.
- Sit on the bench with your back firmly against the pad, holding a dumbbell in each hand using a neutral grip (palms facing your body).
- Allow your arms to hang down at your sides, keeping your elbows close to your body.
- Slowly curl the dumbbells up towards your shoulders while maintaining the neutral grip and keeping your wrists locked in position. Ensure that your elbows remain stationary and close to your body throughout the movement.
- Pause briefly at the top of the movement, squeezing your biceps.
- Slowly lower the dumbbells back down to the starting position.
- Repeat for the desired number of repetitions.
Incorporating hammer incline curls into your workout routine can help stimulate muscle growth in the biceps and forearms, as well as add variety to your strength-training regimen.
Preacher Hammer Curl
A preacher hammer curl is a variation of the traditional hammer curl that specifically targets the biceps and forearms while using a preacher bench for added stability and isolation. This exercise helps to isolate the biceps, minimizing the involvement of other muscle groups and ensuring proper form.
Here’s how to perform a preacher hammer curl:
- Set up a preacher bench with the pad adjusted to a comfortable height for your arms.
- Hold a dumbbell in each hand using a neutral grip (palms facing each other) or use a tricep bar. You can see what a tricep bar looks like in the below pic.
- Position your upper arms against the pad, with your armpits resting on the top edge of the pad. Your chest and shoulders should be pressed against the pad for stability.
- Extend your arms fully, allowing the weights to hang down toward the floor.
- Slowly curl the dumbbells or tricep bar up towards your shoulders while maintaining the neutral grip and keeping your wrists locked in position. Ensure that your upper arms remain stationary and pressed against the pad throughout the movement.
- Pause briefly at the top of the movement, squeezing your biceps.
- Slowly lower the weights back down to the starting position.
- Repeat for the desired number of repetitions.
Incorporating preacher hammer curls into your workout routine can help enhance muscle growth in the biceps and forearms while promoting proper form and minimizing the involvement of secondary muscle groups.
Here’s a tricep bar, which can be used to perform the preacher hammer curl:

Sets, Reps & Frequency: How To Incorporate Hammer Curls Into Your Workout Routine
Okay, you’re sold on hammer curls… But how many times should you perform hammer curls each week, and what is the ideal number of sets and reps per workout for optimal results? Let’s delve into these questions.
Frequency: How Many Times Per Week?
To build bigger biceps and forearms, it’s recommended to train these muscle groups 2-3 times per week. This frequency allows for adequate muscle stimulation while providing enough recovery time between workouts. It’s essential to avoid overtraining, as it can lead to diminished results and an increased risk of injury.
Sets and Reps: Striking the Right Balance
When it comes to hammer curl sets and reps, it’s crucial to find the right balance to maximize muscle growth. Generally, performing 3-4 sets of 8-12 reps works well for most individuals. This rep range is ideal for promoting muscle hypertrophy, the process of increasing muscle size.
However, it’s important to consider your personal fitness goals and individual factors. If you’re focusing on building muscular endurance, you may want to increase the number of reps per set (e.g., 15-20 reps). Conversely, if your primary goal is to build strength, you can perform fewer reps per set (e.g., 4-6 reps) with a heavier weight.
Remember to maintain proper form throughout each rep to reduce the risk of injury and ensure that the targeted muscles are effectively engaged. You can also experiment with various hammer curl variations to challenge your muscles in different ways and promote continuous progress.
Incorporating hammer curls into your workout routine 2-3 times per week with 3-4 sets of 8-12 reps per workout can help you achieve bigger biceps and more muscular forearms. Be sure to maintain proper form and listen to your body to prevent overtraining. Adjust your sets and reps based on your individual goals, and consider incorporating hammer curl variations to keep your workouts fresh and challenging. With consistency, dedication, and a well-rounded strength-training program, you’ll be well on your way to building the strong, sculpted arms you desire.
Hammer Curls VS Bicep Curls
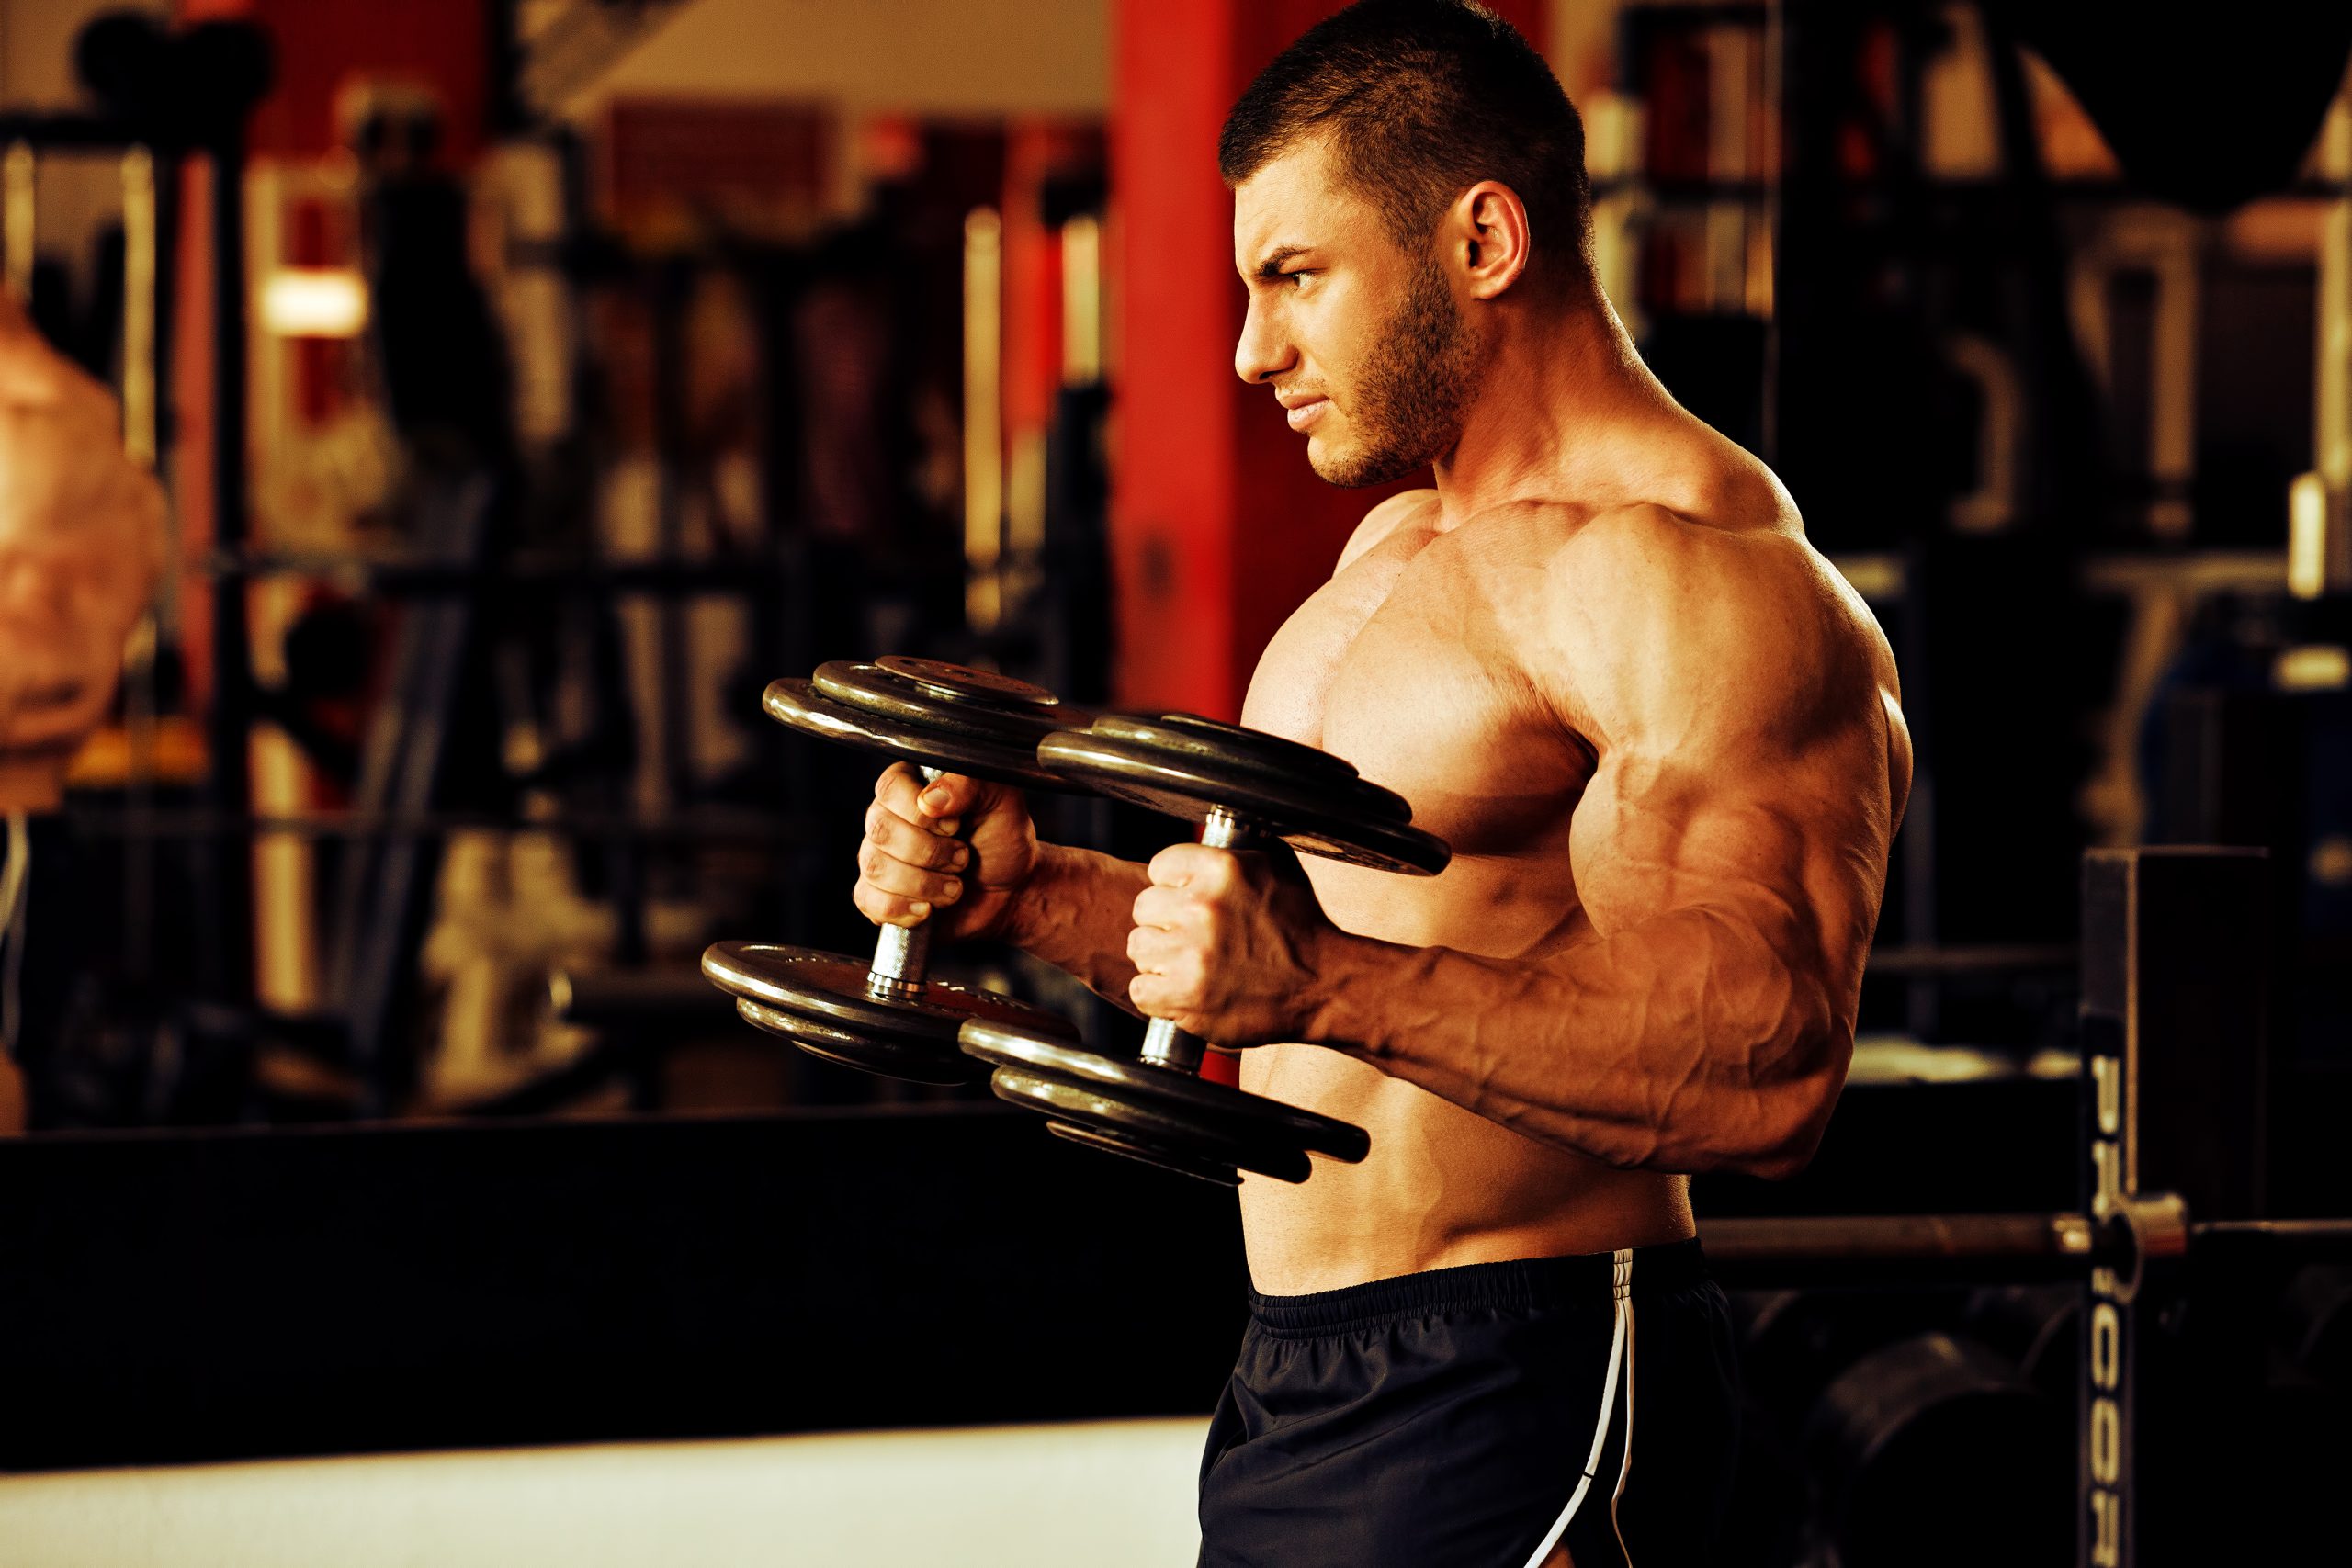
It’s always important to know the difference between exercises, and that’s true for hammer curls vs bicep curls. The most obvious way to tell them apart is the angle of your arm during the curl. With a hammer curl, your arms are in a “hammered” position—palms facing in. A bicep curl is more traditional—elbows at your side and palms facing up.
Below is a picture of a man doing dumbbell biceps curls. I think you will see the difference in the hand angle / placement.

Though a hammer curl looks like just a mundane variation on a bicep curl, it offers some unique benefits that you won’t get with traditional curls. Here’s why:
Activation of long head of the bicep
The primary aim of hammer curls is to target the long head of the bicep under tension. When compared to regular bicep curls, which activate both heads of your bicep equally, you’ll find that it works more outer bicep and upper forearm muscle fibers.
Increased grip strength
Biceps are extensors in their natural state — they help extend any joint they connect to. Hammer curls help strengthen those muscles while also increasing grip strength by activating forearm muscles that don’t get as much attention from standard biceps exercises. This means that you may be able to increase grip strength to a greater extent compared to traditional curls.
Why Alternating Arms Is Important
Alternating arms during the hammer curl offers several benefits compared to performing the exercise with both arms at once. Here are some reasons why you might choose to alternate arms during the hammer curl, or any exercise.
- Improved focus on form: When you work on one arm at a time, you can concentrate more on your form and technique, ensuring you’re activating the right muscles and avoiding potential strain or injury.
- Enhanced muscle activation: Alternating arm exercises often lead to increased muscle activation, as you’re isolating each arm individually. This can help prevent muscle imbalances and promote more symmetrical growth.
- Increased core engagement: As you work one arm at a time, your core muscles need to work harder to stabilize your body and maintain proper balance. This results in a more comprehensive workout that also targets your core.
- Reduced risk of overloading: By focusing on one arm at a time, you can better gauge your strength and adjust the weight accordingly. This helps prevent overloading your muscles and reduces the risk of injury.
- Greater variety and challenge: Alternating arm exercises can add variety to your workout and challenge your muscles in new ways. This can help you avoid plateaus and maintain consistent progress.
What About Seated Hammer Curls?
Seated hammer curls are a variation of the traditional hammer curl exercise that targets the biceps and forearms, particularly the brachialis and brachioradialis muscles. The primary difference between seated hammer curls and standing hammer curls is the position of your body during the exercise. Performing hammer curls while seated helps to stabilize your upper body, minimize body movement, and reduce the risk of using momentum to lift the weights.
Here’s how to perform seated hammer curls:
- Sit on a flat bench or a seat with a backrest for support, with your feet firmly planted on the ground, shoulder-width apart.
- Hold a dumbbell in each hand using a neutral grip (palms facing each other), and let your arms hang down by your sides.
- Keep your back straight, chest up, and shoulders back to maintain proper posture throughout the exercise.
- Slowly curl the dumbbells up towards your shoulders while maintaining the neutral grip and keeping your wrists locked in position. Ensure that your upper arms and elbows remain stationary and close to your body throughout the movement.
- Pause briefly at the top of the movement, squeezing your biceps.
- Slowly lower the dumbbells back down to the starting position.
- Repeat for the desired number of reps and sets.
Here’s a quick demonstration video:
Seated hammer curls offer some unique differences from standard (standing) hammer curls. Standing will allow you to lift heavier dumbbells, but seated will force you to use your muscles to move the weight instead of momentum.
If You Don’t Have Dumbbells, Try Rope Hammer Curls
Instead of using dumbbells, this exercise is performed using a cable machine with a rope attachment, providing constant tension throughout the movement, which can lead to increased muscle activation and growth.
Here’s how to perform rope (cable) hammer curls:
- Set up the cable machine by attaching a rope handle to the low pulley.
- Stand facing the cable machine with your feet shoulder-width apart for stability.
- Grasp the rope handle with both hands, using a neutral grip (palms facing each other). Your arms should be fully extended, and the rope should be taut.
- Keep your back straight, chest up, and shoulders back to maintain proper posture throughout the exercise.
- Slowly curl your hands up towards your shoulders while maintaining the neutral grip and keeping your wrists locked in position. Ensure that your upper arms and elbows remain stationary and close to your body throughout the movement.
- Pause briefly at the top of the movement, squeezing your biceps.
- Slowly extend your arms back down to the starting position, resisting the pull of the cable.
- Repeat for the desired number of reps and sets.
Rope hammer curls are pretty awesome. They are a great alternative to hammer curls. You may want to substitute rope hammer curls for regular hammer curls one day per week. Typically they are done with both arms at once, but you could also perform them single arm.
Conclusion:
Hammer curls are an excellent exercise for building and sculpting your biceps and forearms — and they don’t require a ton of equipment. Taking the time to learn proper form and technique will make the exercise even more effective and give you the best results.
Whatever your fitness goals are, adding hammer curls to your routine can be a great way to target upper body strength and get the gains you want. With the right form and technique, these curls can be an effective part of your training routine and help you build the arms you are looking for.
Time to go, Pump Some Iron!